# Starting a Basic Dapp
Welcome! We'll start with a basic dapp; that is: a JavaScript contract and associated UI.
/** @param {ZCF<{joinPrice: Amount}>} zcf */
export const start = async zcf => {
  const { joinPrice } = zcf.getTerms();
...
}
As we begin, note that help is not far away:
# Getting Support
- Chat with peers on the Agoric Discord (opens new window)
- Join weekly Office Hours (opens new window)
- Search and post Q & A (opens new window) in agoric-sdk discussions (opens new window)
# Platform Requirements
The Agoric SDK is supported on Linux, MacOS, and Windows Subsystem for Linux (WSL).
We support any long-term support (LTS) versions of Node.js.
Download and install from Node.js (opens new window) if you don't
already have node. Check to make sure:
node --version # LTS version such as 18.16.0
Troubleshooting Symbol.dispose error from node v18.19.0
Node v18.19.0 has a breadking change that results in...
Removing intrinsics.Symbol.dispose
failed to delete intrinsics.Symbol.dispose (TypeError#1)
TypeError#1: Cannot delete property 'dispose' of function Symbol() { [native code] }
This is a known issue, but updating this app with the fix may take some time. Meanwhile, please downgrade node to an earlier version.
For reference:
We use the yarn package manager. Installing with corepack (opens new window) is what the yarn maintainers recommend:
corepack enable
yarn --version # 1.x
For this getting started exercise, you will need:
# Create a project with the basic starter kit
Choose a name such as demo and then:
yarn create @agoric/dapp demo
TODO: make dapp-game-places the default
Until dapp-game-places is the default, use --dapp-base etc.
to refer to it:
yarn create @agoric/dapp \
  --dapp-base https://github.com/agoric-labs/ \
  --dapp-template dapp-game-places \
  demo
# Project structure
The demo directory now has:
- README.md
- package.json as usual for a JavaScript project, along with yarn.lock
- contract/ - smart contract source code, tests, etc.
- ui/ - web UI
- docker-compose.yml - for running a local Agoric blockchain
TODO: prune api, agstate
Disregard these contents, for now:
- _agstate
- api
# Install dependencies
The UI depends on the React framework, and the contract depends on the Agoric framework. The packages in this project also have development dependencies for testing, code formatting, and static analysis.
cd demo
yarn install  # may take several minutes
Troubleshooting yarn install
If you run into errors during yarn install,
check that you are on a supported platform and
not native Windows.
Then make sure you have the relevant developer tools installed. For example, on Debian or Ubuntu Linux, run sudo apt get install build-essential.
On MacOS, be install
Xcode (opens new window).
# Start a local Agoric blockchain
To run a local Agoric blockchain with docker compose (opens new window):
yarn start:docker
Note: large docker image
The docker image used here is several gigabytes. The fist time you pull it may take several minutes.
Look at the logs from the blockchain:
yarn docker:logs
After an initial flurry, when it is steadily making blocks, you should see:
agd_1  | 2023-12-05T20:52:42.933Z block-manager: block 956 begin
agd_1  | 2023-12-05T20:52:42.936Z block-manager: block 956 commit
agd_1  | 2023-12-05T20:52:43.944Z block-manager: block 957 begin
agd_1  | 2023-12-05T20:52:43.946Z block-manager: block 957 commit
Use control-C to stop viewing the logs and return to a shell prompt.
Note: logs include benign error messages
You can disregard messages such as:
v5: TypeError: target has no method "getDisplayInfo"
These are artifacts of replaying historical events.
# Deploy the Contract
Let's deploy the contract:
yarn start:contract
This start:contract script will do a number of things that we will cover in more detail later (transaction commands, permissioned deployment):
- Bundle the contract with
agoric run ... - Collect some ATOM with
agd tx bank send .... - Use the ATOM to open a vault to mint enough IST to pay to install the bundles on chain with
agops vaults open .... - Install the bundles on chain with
agd tx swingset install-bundle .... - Collect enough BLD to pay for a governance deposit with
agd tx bank send ... - Make a governance proposal to start the contract with
agd tx gov submit-proposal swingset-core-eval .... - Vote for the proposal; wait for it to pass.
- Print key material for an account you can use.
# Set up Keplr wallet and import account
Keep your own mnemonic seed phrase confidential!
For any mnemonic phrase you use to secure your own assets, take care to keep it strictly confidential! The mnemonic here is only for testing. Using a separate browser profile is a good way to avoid accidentally using the wrong account when testing vs. with real assets.
Install the Keplr Wallet (opens new window) if you have not done so already. Then copy the mnemonic phrase printed at the end of the previous step
and use it to add an account. For example copy congress thru switch in the following:
Import the following mnemonic into Keplr:
congress goose visual acid shine view pair fruit chaos boost cigar upgrade certain warrior color omit perfect clutch little bulb divorce split fashion switch

The resulting address should be: agoric1a3zu5aqw255q0tuxzy9aftvgheekw2wedz3xwq
How to import mnemonic to add a Keplr wallet
- Inside your Keplr wallet browser extension, press the ‘Accounts’ icon on the top right corner and then click the ‘Add Wallet button.
Choose Import an existing wallet.
Choose Use recover phrase or private key.
Paste the mnemonic. Hit Import.
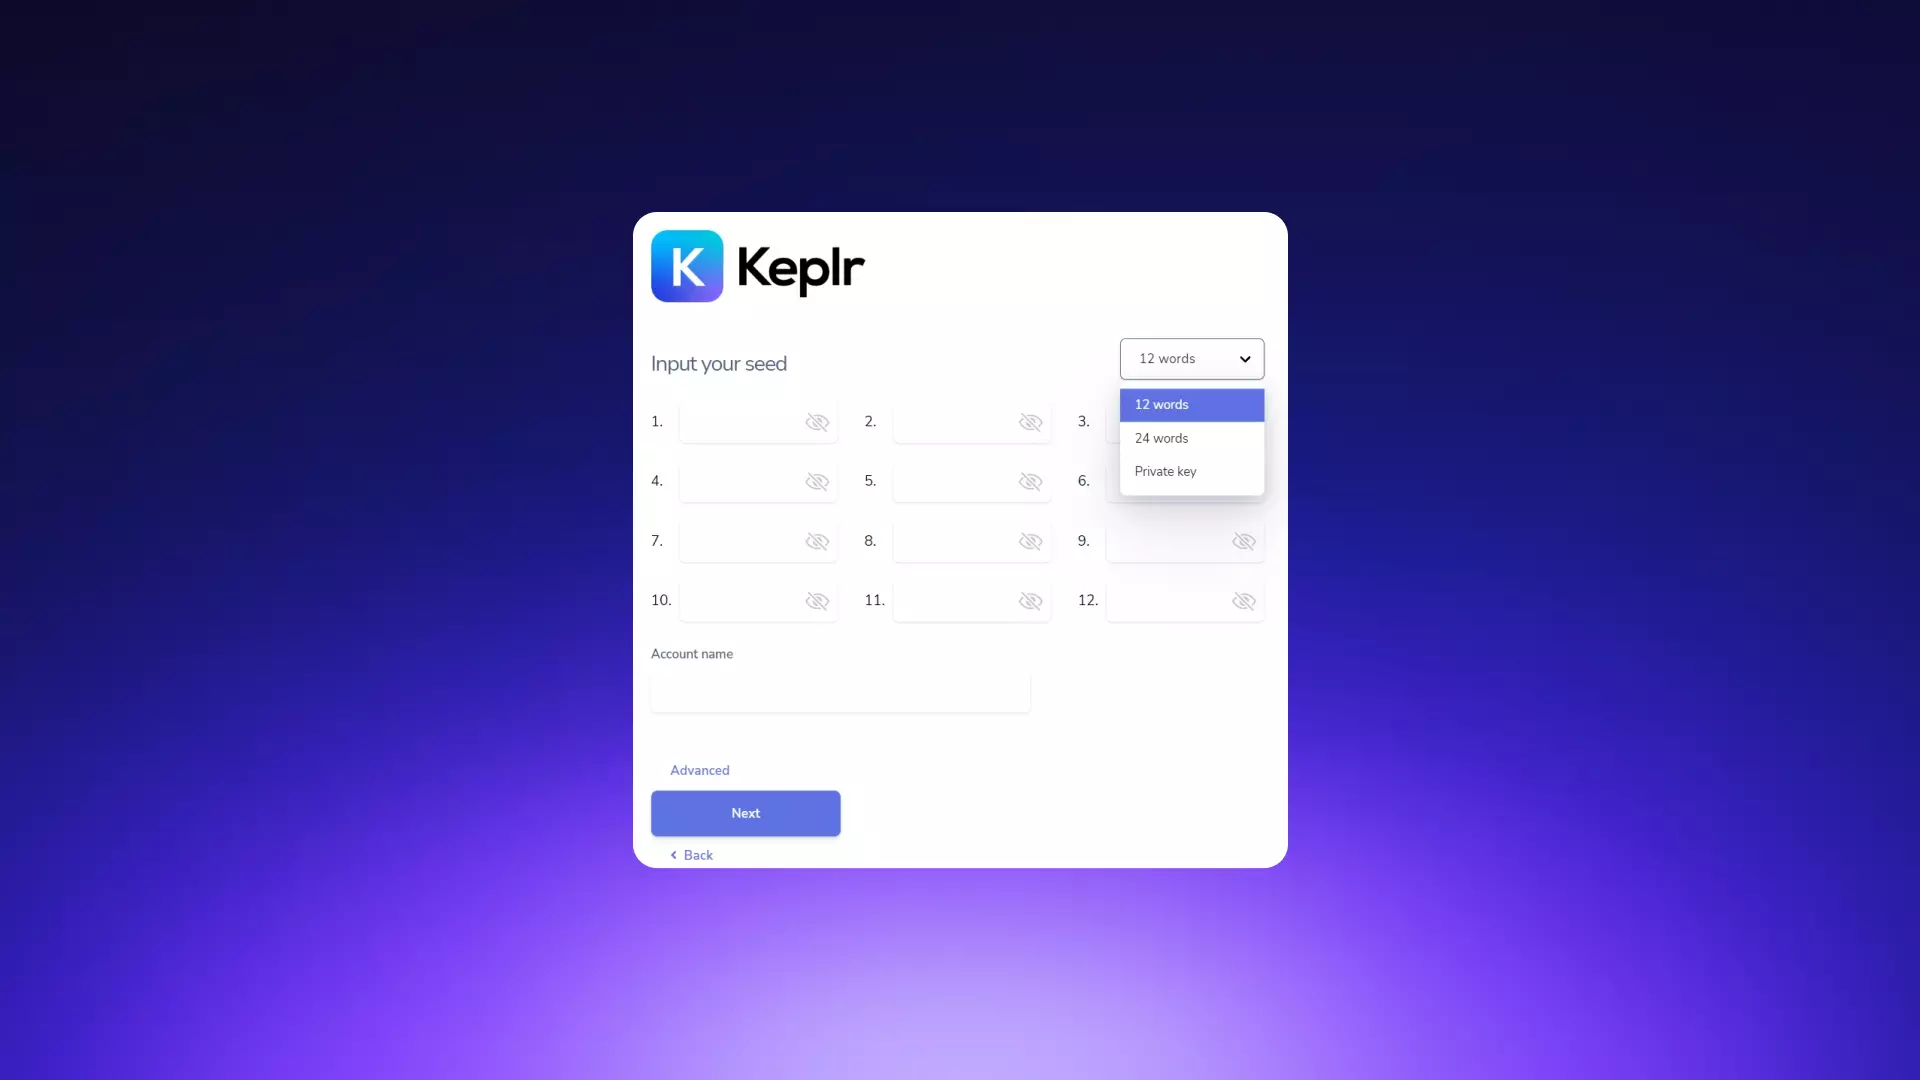
Enter a Wallet Name such as
user1. Hit Next.On the Select Chains page, hit Save (choice of chain does not matter at this point.)
See also:
# Start the Dapp UI
To start the Dapp UI:
yarn start:ui
The result includes a link:
  VITE v4.5.0  ready in 132 ms

  ➜  Local:   http://localhost:5173/
  ➜  Network: use --host to expose
  ➜  press h to show help
Follow that link to get the Dapp UI:
Then hit Connect Wallet. The UI should show your address and your IST balance, after you approve an Add Agoric local to Keplr dialog.
# Make an Offer
Then hit Make Offer. Keplr should show an offer to give 0.25 IST and want a few places. Approve the offer to sign and broadcast it to the (local) blockchain.
After a few seconds, the UI should show the places.
Congratulations! You are on your way to building dapps on Agoric.